
News
DIY: Build An Arcade Controller For Pocket Operators
Oct
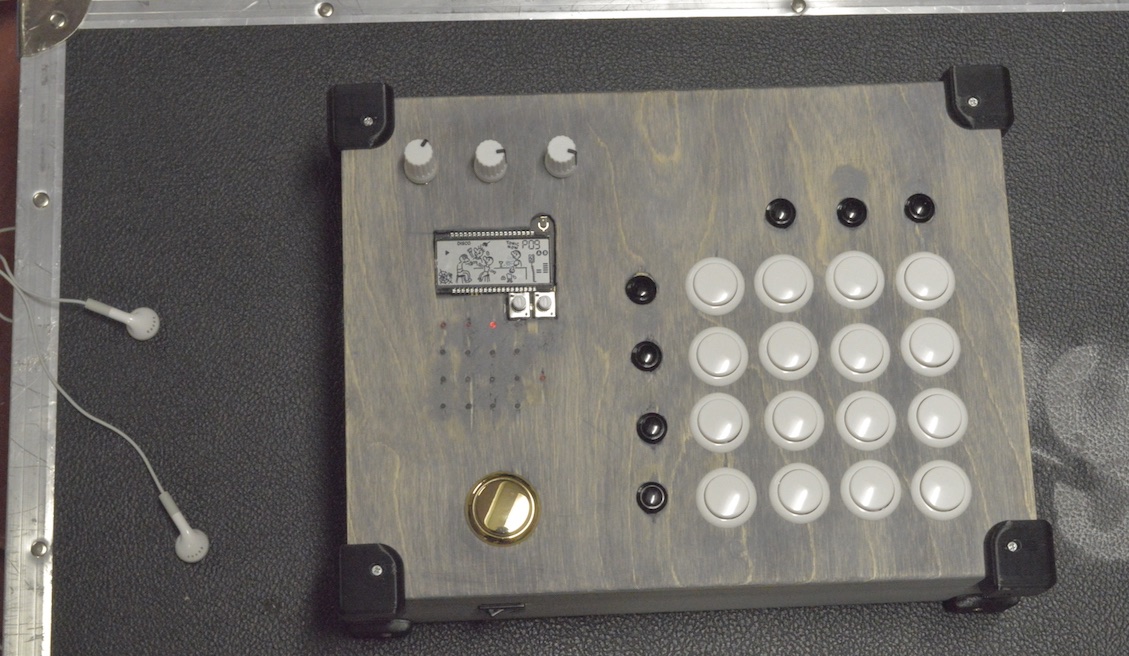
Teenage Engineering’s Pocket Operator series has made their way into DJ booths and studios with great results. These are extremely portable, fun synthesis toys. What if you could have a full size standalone drum machine using with the PO as the brain?
Today DJTT contributor Kyle Mohr has made a step by step guide. Learn how to create a DIY arcade button controller for the Pocket Operator without circuit boards or any coding!
Watch Kyle’s How To Video
Watch The Original Inspiration
Before we get hundreds of comments letting us know we weren’t the first people to do this, know that this tutorial is inspired by beatmaker Ally Mobbs on YouTube. Watch the original video here:
Shopping List
First, purchase all of your tools and materials. I’ve provided many links for Amazon and US retailers below. Beyond getting your own Pocket Operator (available on the DJTT store or Teenage Engineering’s), see the shopping lists below.
Click the below sections to expand the lists:
Parts
- 24mm Sanwa Arcade Buttons (From FocusAttack.com): https://goo.gl/7gPxWY
- 30mm Sanwa Arcade Buttons (From FocusAttack.com)
- Mini Arcade Buttons: http://goo.gl/544gD0
- DJTT Chroma Caps: https://goo.gl/aoetQ3
- B10k D-Shaft Potentiometers: http://goo.gl/RzHf1L
- Micro Lipo Charger: https://www.adafruit.com/product/1904
- 1N4001 Diode: https://www.adafruit.com/product/755
- On/Off switch: https://www.adafruit.com/product/3064
- Lithium Ion Polymer Battery – 3.7v 500mAh: https://www.adafruit.com/product/1578
- 30 AWG Silicone Wire: https://www.adafruit.com/product/3164
- Panel mount micro usb extension cable: http://amzn.to/2fnKTBJ
- Audio Cable: http://amzn.to/2vfrLK4
- 3.5mm audio jack: https://goo.gl/rtFtVp
- 1/4” Mono audio jack: https://goo.gl/7R8pBf
- Light tubes: https://goo.gl/BKYcZd
- PO Battery Eliminator (Dich Studios): https://goo.gl/KtjvUn
Enclosure
- Wood Box: https://goo.gl/QMTC8L
- Rubber Feet: http://amzn.to/1Nobp3R
Tools
*Note: It will put you way over a basic budget if you need any of these tools. If you plan to do more projects in the future they, will come in handy. You can always buy them really cheap on eBay and Amazon.
- Sugru Moldable Glue: https://sugru.com/
- PanaVice Jr. – http://amzn.to/2vcC1Ey
- Helping Third Hand Tool: http://amzn.to/2vjovxf
- Wire Cutters: http://amzn.to/1J2zM7w
- 30-20 Gauge wire stripper – http://amzn.to/2hIvqNI
- Fine Tip/heat resistant Tweezers – http://amzn.to/2vfBboQ
- Soldering Iron: http://amzn.to/1Lm9rSl
- Rosincore Solder: http://amzn.to/2wJoFOY
- Soldering Flux: http://amzn.to/1P4F4zD
- Soldering Exhaust Fan: https://www.adafruit.com/product/3544
- Drill: http://amzn.to/1HxjMbG
- Drill Bit set: http://amzn.to/1fMz2s7
- Hobby Files: http://amzn.to/1TFm9yq
- 24mm or 1in Spade Bit: http://amzn.to/1UCYD5B
- 15/16-in Hole Saw: http://amzn.to/2uVasw8
- 30mm Forstner bit: http://amzn.to/2fvZPxR
- Plier set: http://amzn.to/1h0QdXw
- Small Screw Driver Set: http://goo.gl/SUuqmt
- Hot Glue Gun: http://amzn.to/1JaUC6o
- Hot Glue Sticks: http://amzn.to/1J2ATnu
- Mini Hack saw: http://amzn.to/1MmGyYg
- Box Cutter: http://amzn.to/1HGCJVV
- Dremmel with wood cutting bit: http://amzn.to/1MmGDLw
- Sandpaper: http://amzn.to/1NoiDVz
3D Printing & Finishing Touches
- Hatchbox 3D Filament: http://amzn.to/29U6Sen
- 3D Printer: http://amzn.to/29a0rRZ
- Blue Painters Tape: http://amzn.to/29fPqRF
- Stain: http://amzn.to/2wnFTkO
- Rags: http://amzn.to/1HECfiU
- Gloves: http://amzn.to/1f7WfDQ
Design/Preparation
Before you get started, lay all your parts and components out to see the spacing and layout you would like to use. Then measure this area to evaluate how large of an enclosure you will need.
Once you have dimensions, creating a sketch in Illustrator, CAD or even by hand is useful enough to serve as a guide. Just be sure there is enough spacing between each component to avoid cracks and shorts. If you are using a PO-32, make sure to leave a space for the built-in mic as well.

For a guide I ended up designing and 3D printing a few stencils to use to for the button, knob and component spacing. Download them here.
Enclosure
You can use anything for an enclosure. I ended up using a cheap wood box from a local from craft store as done in previous projects. This saved me the time of building the box, but in hindsight, a plastic or 3D-printed enclosure would have been much easier to work with and have saved time.

Just make sure before you start drilling holes that you measure all components and their clearance.
Drilling For Components
For arcade buttons, we will use the 24mm and 30mm spade bits or hole saw as needed. A hole saw will give you a cleaner cut and put less tension on the wood.
For both your audio inputs and light tubes, I suggest following the directions on the product pages. Depending on what type you use can call for varying sizes.
With both thin wood and plastic, to keep it from cracking when drilling, make sure to choose about 6-7 drill bits from very small to your final size.
Drill bit sizes I commonly use for the potentiometers and Mini Arcade Buttons are (in inches): 3/32, 1/8, 5/32, 3/16, 7/32, 1/4, 5/16 (and larger if needed)
This will help you slowly get to your desired size without putting too much tension on the material causing it to crack, chip or break. The key is to drill at slow speeds, and gradually go up to the size you need. If something starts to crack or chip, quickly stop and put your drill direction in reverse. Try using it in reverse for a bit to clean up the cut.
Once you’ve drilled, cut, and dremeled your way through the enclosure – clean it up! Don’t worry, it always looks like a little rough. The key is to take your time. Try to drill and mark up the inside (spots people won’t see) and even place a spare board under the enclosure that you can drill into. This also helps to reduce tension on the enclosure. If you have access to a laser cutter, use that instead. It will save tons of time and will be very clean, precise cuts.

If you used wood, consider adding some stain to help show the wood grain and give it character. Most new stains are fast drying and should be able to use after only 1 hour!
Adding Components
Finished your layout and enclosure (and let it dry if stained or painted)? Time to add your buttons, knobs, audio outputs and light tubes to the enclosure.
- Arcade buttons usually just pop in easily. The mini ones will require a fastener or nut to be placed on the back to secure it. (If there is a little resistance, don’t force it, just take a file to it a few times then try again)
- Potentiometer knobs will then be placed in with washers and nuts. These should cover any jagged edges you may have from drilling. Tighten with pliers. To protect these, add your DJTT Chroma Caps to the 3 pots.
- Add the light tubes. These should fit snugly so they do not wiggle or fall out. If needed, add a little transparent glue around them inside the enclosure, but be sure not to cover the end as it could prevent the light from traveling through them.
Soldering + Wiring
If you haven’t soldered before there is a wealth of tutorials on YouTube. Here are a few of my favorites. It’s not complicated at all, anyone can do it. Just take your time and pay close attention.
Turn on your soldering iron and let it heat up. While its heating up, get out the 30 AWG silicone wire. This wire is super thin and flexible, which will come in very useful for the small soldering points.

You’ll want to start at the bottom and work your way up. Daisy-chaining all the ground from each button together. Make sure you color coordinate each ground and signal wires separately to avoid any confusion.
Next you want to run the signal line from each arcade button to the signal line from the Pocket Operator. This is the bottom left pin on each button of the Pocket Operator.
Beat Repeat Hack (Optional)

Ally Mobbs came up with this concept. It is a cool hack where if you connect the 30mm arcade button (or any button) and solder the two points of that button one to the common ground, and another to the ground (-) solder point for the external speaker optional hookup on the back of the PO, it will create a beat repeat effect when pressed.
Note: When the headphone jack is plugged into, it will disable the external speaker function and this hack. To work around this, I added a switch which would toggle between the built-in speaker (allowing the beat repeat to work) and the external panel mounted outputs (headphones).
Rechargeable Battery

Forget stacking up on AAA Batteries, with this mod we are going with a rechargeable option. Thanks to our friends over at Adafruit, we were able to come up with the 1st option above.

You utilize a Micro Lipo Charger board with a 3.7v 500mAh Lithium Ion Polymer Battery. It won’t have the same life as AAAs, they only take about two hours to recharge and give you a few hours of consistent play (this will also work if plugged into any USB to micro cable/charger).
The board and battery provide around 3.7v, but the PO takes 3v exactly to work properly. This is where the 1N4001 Diode comes into play, it will shave off the extra 0.7v.
Lastly, I put an on/off switch between the battery and the Micro Lipo board to turn the PO on and off. This is completely optional, as it has an automatic sleep function, just be aware this may run the battery down faster.
In addition to the above we also found an alternative option for the faint of heart (or those who hate soldering). It’s the PO Battery Eliminator from Dich Studios. This simply converts the AAA battery slot on the back of the PO into USB powered. If you still want to keep it wireless, the next step would be to connect it to one of those cheap cell phone power banks and then attach that to a panel mount micro USB extension cable.
External Potentiometers

While we won’t be removing the built-in knobs (that can get a bit messy and cause some issues to the PO) we will disconnecting them and extending their solder points to 3 panel mounted potentiometers which will be the 2 existing + 1 volume.
First, break the current connection from the PO pots by cutting their pins which make the connection. Then separate them enough to put either Sugru or some hot glue between them to make sure they don’t touch.

Next, attach a wire from each cut pin and then run that wire to the panel mounted potentiometer.
External Outputs

Next setup the audio inputs/outputs. We used the schematic above for taking an audio cable and converting 1/8” and 1/4” jacks. The basic audio cable we are using can be found anywhere and is easy to convert. Cut the cable in half and notice you should have 3 cables (or 2 with 1 stranded cable wrapped around the two). In this case we have a red (Ring/Audio), white (Tip/Sync), and uncased silver wire or black (Ground/Sleeve).

Prep the cables for use. Separate the 3 cables and strip each one to expose the wire. Then solder a longer cable to it (this acts as an extension). For the line-in/sync side (left input jack on the PO), run this directly to the panel-mounted 1/8” jack. The top prong that sticks out is the ground, the middle is the audio and the bottom is the sync. After these cables are soldered to the jack we’re done for that side.
If you are using a volume knob or 1/4” additional jack (both optional), this adds a bit of complexity to the wiring. If you choose not to, just repeat the same step as the previous jack.
For the Audio out, attach the audio line through the potentiometer then back out to the 1/8” jack, then also daisy chain that audio, splicing it out to the 1/4” jack as well. The sync cable will go directly to the 1/8” jack only.
That’s it for audio in/out. Again, the volume knob and 1/4” are not completely necessary, especially since you can adjust the volume directly inside the PO using the button functions to assign loudness from 1-16.
Protecting The Connections

Before we test our creation, first clean up flux residue with a paper towel and/or Q-tip (for hard to reach areas) and rubbing alcohol. This will remove any materials which could overtime corrode your board and connections.
After that dries it’s time to cover your connections that could potentially touch another and cause a short. You have a few options here, but I love to use Sugru. It’s a moldable playdough-like glue which later dries into a flexible and insulating rubber.
I used throughout this entire project to cover everything from cables, screws, mount buttons and connectors. I even used it to secure the Pocket Operator itself. It also does wonders for managing those cables that are all over the place inside your enclosure.
Final Touches
To truly finish this mod I did will a few custom touches. First, I added Chroma Caps to the external/panel mounted potentiometers.
I also used a 3D printer to print custom brackets to hold the Pocket Operator and battery into place. Alternately you can use Sugru or hot glue to hold it in place. I also 3D printed corner pieces for the enclosure to protect it from any bumps along the way.
For this project’s printing, I used of Hatchbox 3D printing filament. It looks great and is amazing quality for a low price. Normally filament comes in small amounts starting at $35-40, and this is ~$20 and does a far better job.
Finally, add rubber feet to the bottom to prevent it from sliding around the desktop or booth when using it. These are super cheap and can be found at almost any hardware store.
Mods Made Easy
If you like this project, but don’t like the idea of starting from scratch or building an enclosure, Ally Mobbs is selling kits where all you need to do is solder and buy the Pocket Operator .
If you like the idea of larger buttons but want to keep it ultra-portable, Dich Studios makes awesome custom PO cases (and will offer pro versions).
Share Your Finished Product

You’ve built a wild, large button, tabletop Pocket Operator. Now you can really jam on those arcade buttons. Enjoy! Be sure to post pictures of your mods in the comments below or tag @DJTechTools on your preferred social network.
Special thanks to the following groups for providing resources or otherwise helping with this article: Noe Ruiz & Adafruit.com, Dich Studios, Ally Mobbs uhlectronic, Teenage Engineering
Guide, Design, and Video Editing By: Kyle Mohr
All Video Shot By: Alex Medvick