
News
Even More Serato DJ Pro MIDI Hacking: Deleting Cue Points, Tone Play, Multiple Modifiers

Oct
Serato DJ Pro offers one of the most advanced feature sets in DJ software, but unlike other softwares, the MIDI mapping functionality is limited at best. In today’s article, Teo Tormo has figured out even more advanced functions that can be custom mapped, including tone play, cue point deletion, and more. He’s also sharing his own custom mapping for the Midi Fighter 3D that uses many of these functions – keep reading to watch a demo, download a mapping, and learn how it all works.
Serato’s MIDI Limitations
Serato DJ Pro doesn’t allow MIDI mapping for many functions that are used on many Serato-intended DJ controllers. If you’re bringing your own device, it’s impossible to:
- map a modifier or shift button for secondary functions with the same button, pad or switch. This can lead to serious inefficiencies in mappings – like having to use different controls for creating and deleting hotcues.
- make mappings where you trigger several functions using one button
- customize the MIDI messages for LED lighting
- map some functions at all – like song scrubbing or seeking
In a previous article I demonstrated how many functions become available if you write your own mappings using the XML scripting language that Serato uses for the mappings.
In today’s article we’re going deeper – showing you how to map even more functions and combine them. This time I’ve used a Midi Fighter 3D to map some extensive Serato functionality. I’ve created a very special mapping that makes an intensive use of modifiers (yes, more than one), multiple functions assigned to one button, and some hidden functions that are only available for certified controllers. The result is a mapping that makes the Midi Fighter 3D (or with some adaptation, any controller) work almost like an official Serato controller.
Author’s Note: this mapping is the result of my own investigations, and the result of collecting a lot of disperse information around the web at the Serato official forums, DJTT forums, social networks, many blogs, etc. So, I have to credit this work to the worldwide Serato users community that have shared their discoveries in advanced mappings.
The MF3D Mapping
You can download the mapping on our MIDI mapping repository, maps.djtechtools.com. To use it, you have to load settings file MF3DSerato.mfs the in the Midi Fighter Utility and send the settings to the controller for the controller using the “Send to Midi Fighter” big blue button at the bottom of the software. Also, you’ll need to copy the MF3D.xml file (this is the Serato mapping) to the folder Music > _Serato_ > MIDI > Xml folder. After that, load up Serato, go to Preferences > MIDI, and the mapping will be available there; just select it and click on “Load”.
Watch the below video to see some of the features of the mapping (don’t expect a spectacular controllerism routine, I was just testing some controls and features):
The full set of features that the mapping can control are not all in the video, so I’ve highlighted them below. Where I talk about left or right side buttons, these are the three small buttons either side of the Midi Fighter 3D:
- All the features are mapped for a two deck Serato setup. Each of the four banks controls different functions for both decks, using side buttons of the controller for enabling secondary functions of some buttons and also some extra “modes”.
- First bank contains transport and library functions. The third left side button acts as “shift” in this bank, and while you press it, if you press “Play” you will activate reverse playback, and if you press “Cue” you will activate “previous track”. If you press the “send to prepare” button (top right) while you use the “shift” button you will open/close the prepare tab in Serato.
- Second bank contains cues. The first two rows of buttons are for deck 1. The second two rows are cues for deck 2. Color of the cues match the default Serato cue color coding, but if you change the colors of the cues from the software, there’s no RGB feedback (one of the few things I was not able to map). This bank also has two powerful modes: cue delete mode and tone play mode.
- Cue delete mode is activated pressing the first left side button (just click it, you don’t need to hold it). Set cues will flash, press on one of them and it will delete that cue point.
- The third left side button enables/disables the tone play mode. In this mode you will play in different tones the 8th cue.
- On the same bank the right side buttons are mapped with flip functions. First button enables flip record, second one saves the flip, and the third enables/disables the “temp flip on”.
- Fourth bank holds sampler controls, but the last row of buttons are mapped to launch Flips. In this bank, the third side button on the left and on the right stop the Flips on decks 1 and 2 respectively.
- The bank change buttons on the top of the MF3D also changes the tab of the performance controls on both decks. If you select the second bank, Serato will switch to the cue slots; if you select the third bank, you’ll see the loop slots. The fourth bank has controls for launching Flips, so switching to it will show the Flip slots in Serato.
Well, you can’t do it using the “official” mapping system inside Serato DJ Pro. You have to write the mapping using an XML editor (I strongly recommend Komodo, it’s free and available for macOS and Windows). You don’t have to write everything as you can map some controls directly using Serato and later change the code or add more with the editor.
Before starting, remember two things:
- If you load your own mapping in Serato, and then map more controls in Serato, if you click on “Save” Serato will not only save the changes, it will probably mess up a lot of the code you wrote. This can disable many features you previously mapped. Block or write protect your mappings before loading in Serato – or just keep a safety copy outside of Serato’s folders.
- If just one character is in the wrong position in the XML code, or any expression or combination of commands is not accepted by Serato, the mapping will not load, instead giving a error message. Of course Serato will not tell you what is wrong with your mapping.
Every Serato XML control definition starts with <control> and ends with </control>. Inside that, you’ll need to use the expressions to define the MIDI control and channel you will use, the behavior, and the possible variations if you are using modifiers. Every mapping starts with the <midi> markup and ends with </midi> markup; in the first markup you can set (as Serato does) the version number of the used Serato software, but it is not essential. It’s something like <midi app=“ 2.0.4.4588”>.
The XML is usually written with indentations, for every new markup inside another markup it’s a good idea to add more indentations. XML editors like Komodo will do that for you automatically (and also warn you if you break some XML syntax rule). You can insert comments in the code, it’s a good idea for very long mappings as it will help you to locate or identify certain parts of the code. If you want to insert a comment, start a comment line with <!— and end it with —>. There are a lot of comments in the MF3D mapping of the article, so you can easily locate which part of the code defines almost every function.
Let’s start by looking at how a common control like Play is defined: CLICK TO SHOW CODE
    <control channel="3" event_type="Note On" control="36">

        <userio event="click">

            <play deck_set="Default" deck_id="0" slot_id="0">

                <translation action_on="press" behaviour="toggle"/>

            </play>

        </userio>

        <userio event="output">

            <play deck_set="Default" deck_id="0" slot_id="0">

                <translation action_on="any">

                    <alias name="on" value="61"/>

                    <alias name="off" value="67"/>

                </translation>

            </play>

        </userio>

        </case>

   </control>
In the first line, the MIDI control that will be mapped is defined. You can see that we are using channel 3 (by default arcade buttons on the MF3D use channel 3, side and bank buttons use channel 4), the control is a note command, and it is numbered as 36. In the second line, we define it as an input command with the expression <userio event=“click”>. For the LED lighting command you must change “click” with “output”. Remember that if you are using a controller and you don’t know the MIDI commands which can send, you can use a MIDI monitor software to view every message that your controller sends and receives.
In the third line, we first name the control we are mapping – play – and then we say which play control using the variable deck_set, defined as “Default”. This refers to the common decks, and deck_id=“0” refers to deck 1, and slot_id is used for defining multiple elements that work as one – like the cue slots, loop slots, flip slots. Everything is indexed with 0, so if referring to the first cue, it’s 0, the second cue is 1, the third is 2, and so on.
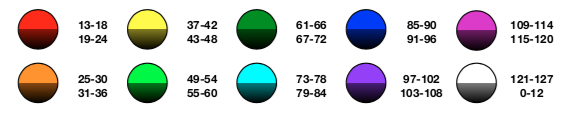
The second part of the definition starts with <userio event=“output”>, indicating that we are going to define the LED lighting controls. In the “alias” part of the code we set the velocity values that Serato sends to your physical controller, 61 for enabling, 67 for disabling. In the MF3D those values are for two different levels of brightness of the green color as you can check it out in this table from the MF3D manual:
Now we are going to see how modifiers work; first let’s look at a definition for a modifier: CLICK TO SHOW CODE
<control channel="4" event_type="Note On" control="20">

        <userio event="click">

            <modifier_3>

                <translation action_on="any" behaviour="explicit"/>

            </modifier_3>

        </userio>

    </control>
This modifier is the one used in the first control bank of the MF3D mapping. We simply tell to the software that the note 20 message at channel 4 is the modifier and will be enabled by any action (press or release the button). If you want to set up a modifier that works like a “switch” that changes with every click, you will need to change “any” to “press” and “explicit” to “toggle”.
Now that we have a modifier, we can use it with the previous play command, let’s see how it is used in the mapping code: CLICK TO SHOW CODE
    <control channel="3" event_type="Note On" control="36">

        <case>

            <condition>

                <modifier_3 operator="equal" cmp_value="off"/>

            </condition>

        <userio event="click">

            <play deck_set="Default" deck_id="0" slot_id="0">

                <translation action_on="press" behaviour="toggle"/>

            </play>

        </userio>

        <userio event="output">

            <play deck_set="Default" deck_id="0" slot_id="0">

                <translation action_on="any">

                    <alias name="on" value="61"/>

                    <alias name="off" value="67"/>

                </translation>

            </play>

        </userio>

        </case>

        <case>

            <condition>

                <modifier_3 operator="equal" cmp_value="on"/>

            </condition>

            <userio event="click">

                <reverse deck_set="Default" deck_id="0" slot_id="0">

                    <translation action_on="press" behaviour="toggle"/>

                </reverse>

            </userio>

        </case>

    </control>
We define the control in the first line, but after that we use the <case> markup to define a command when the modifier is pressed or not. After the <case> markup we use the <condition> markup to defining which modifier we will use and if it will be activated or not. After the full definition of the control, we close the case with </case>. Then we define another case with a condition where the modifier is in another state. In the second case, we define the reverse function (which is triggered if you press the modifier and the play button), that can’t be normally mapped using the Serato mapping system.
In the condition area you can set as many conditions as you want. This means you can use more than one modifier and their states to define a case. You can see that in the definition of the cue controls: CLICK TO SHOW CODE
     <control channel="3" event_type="Note On" control="64">

        <case>

            <condition>

                <modifier_1 deck_set="Default" operator="equal" cmp_value="off"/>

                <modifier_2 deck_set="Default" operator="equal" cmp_value="off"/>

            </condition>

        <userio event="click">

            <cue_point deck_set="Default" deck_id="0" slot_id="0">

                <translation action_on="any" behaviour="explicit"/>

            </cue_point>

            <absolute_key_shift deck_set="Default" deck_id="0" slot_id="0">

                    <translation action_on="press" behaviour="static" static_value="0"/>

                </absolute_key_shift>

        </userio>

        <userio event="output">

            <cue_point_set deck_set="Default" deck_id="0" slot_id="0">

                <translation action_on="any">

                    <alias name="on" value="18"/>

                    <alias name="off" value="79"/>

                </translation>

            </cue_point_set>

        </userio>

        </case>

        <case>

        <condition>

            <modifier_1 operator="equal" cmp_value="on"/>

            <modifier_2 operator="equal" cmp_value="off"/>

        </condition>

        <userio event="click">

            <cue_point_delete deck_set="Default" deck_id="0" slot_id="0">

                <translation action_on="any" behaviour="explicit"/>

            </cue_point_delete>

        </userio>

        <userio event="output">

            <cue_point_set deck_set="Default" deck_id="0" slot_id="0">

                <translation action_on="any">

                    <alias name="on" value="18"/>

                    <alias name="off" value="79"/>

                </translation>

            </cue_point_set>

        </userio>

        </case>

        <case>

            <condition>

                <modifier_1 operator="equal" cmp_value="off"/>

                <modifier_2 operator="equal" cmp_value="on"/>

            </condition>

            <userio event="click">

                <cue_point deck_set="Default" deck_id="0" slot_id="7">

                    <translation action_on="any" behaviour="explicit"/>

                </cue_point>

                <absolute_key_shift deck_set="Default" deck_id="0" slot_id="0">

                    <translation action_on="press" behaviour="static" static_value="-4"/>

                </absolute_key_shift>

            </userio>

            <userio event="output">

                <cue_point_set deck_set="Default" deck_id="0" slot_id="1">

                    <translation action_on="any">

                        <alias name="on" value="42"/>

                        <alias name="off" value="41"/>

                    </translation>

                </cue_point_set>

            </userio>

        </case>

     </control>
As you can see in that chunk of code, after every <condition> markup there are two modifier states that define the possible situations of the left side buttons.
Look carefully at the <userio event=“output”> markups, because the LED lighting of the cues is not controlled by the same command that Serato uses for triggering cues. The command that Serato lets you use when you map something using the software is cue_point, but for lighting you will need to use cue_point_set. You can see that the modifiers are used for defining the “cue delete mode” (using the cue_point_delete command) and the “tone play mode”, that combine in the same definition the trigger of the 8th cue point and the key shift function (using absolute_key_shift command).
Every possible combination of the two states of the two modifiers are defined… well, almost, because the two “on” values of both modifiers does not have real use here, so it is not defined. Modifiers 1 and 2 have been defined previously as “toggle” modifiers: CLICK TO SHOW
    <control channel="4" event_type="Note On" control="28">

        <userio event="click">

            <modifier_1>

                <translation action_on="press" behaviour="toggle"/>

            </modifier_1>

        </userio>

    </control>


    <control channel="4" event_type="Note On" control="26">

        <userio event="click">

            <modifier_2>

                <translation action_on="press" behaviour="toggle"/>

            </modifier_2>

        </userio>

    </control>
The flashing lights commands are in a different part of code: CLICK TO SHOW
    <control channel="4" event_type="Note On" control="64">

        <case>

            <condition>

                <modifier_1 operator="equal" cmp_value="on"/>

            </condition>

        <userio event="output">

            <cue_point_set deck_set="Default" deck_id="0" slot_id="0">

                <translation action_on="any">

                    <alias name="on" value="39"/>

                    <alias name="off" value="1"/>

                </translation>

            </cue_point_set>

        </userio>

        </case>

        <case>

            <condition>

                <modifier_1 operator="equal" cmp_value="off"/>

            </condition>

        <userio event="output">

            <cue_point_set deck_set="Default" deck_id="0" slot_id="0">

                <translation action_on="any">

                    <alias name="on" value="1"/>

                    <alias name="off" value="1"/>

                </translation>

            </cue_point_set>

        </userio>

        </case>

    </control>
In the above code, we used a special feature of the MF3D – if you send a velocity value of 39, the lights will flash.
The majority of the mapping is made by combining modifiers and commands in one control. That’s what makes it advanced and allows such a variety of controls on the same buttons.
Explaining all the commands and definitions would need a complete “Serato Advanced Mapping” book and not just an article. That said, I’ll show you three more hidden commands that are not available from the software.
The commands multi_tab_flip , multi_tab_loop and multi_tab_cue are used for changing the performance slots showed in then Serato software. They are used like this: CLICK TO SHOW CODE
    <control channel="4" event_type="Note On" control="3">

        <userio event="click">

            <multi_tab_flip deck_set="Default" deck_id="0" slot_id="0">

                <translation action_on="press" behaviour="toggle"/>

            </multi_tab_flip>

        </userio>

        <userio event="click">

            <multi_tab_flip deck_set="Default" deck_id="1" slot_id="0">

                <translation action_on="press" behaviour="toggle"/>

            </multi_tab_flip>

        </userio>

    </control>
In that chunk of code, we define that when the control is activated, both decks’ performance slots change to the Serato Flip slots.
Help Us Find The Cue Point Color Names
There’s one thing that I wasn’t able to map: the feedback for the RGB lighting of the cues. I’ve found that the command cue_point_set_feedback works, but only for the “off” setting. I believe that in the name=“on”, the “on” must be changed with the name of the colors, but I think that the names are coded in some way (I’ve been trying words like “blue”, “red”, “BLUE”, “Blue” with no luck), so if someone wants to try…
And that’s all for this article! My personal recommendation is that, if you understood some of the above code explanations, slowly review the full mapping code and you’ll find out how everything works. Once you understand the basics, it’s like reading a book – and then you’ll be able to adapt it to any controller you want.
If you have any questions, don’t hesitate to ask in the comments. And if you know how to map new things in Serato, share your advice and tips!